
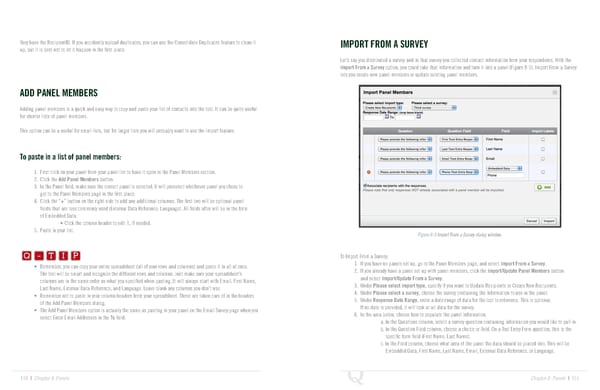
they have the RecipientID. If you accidently upload duplicates, you can use the Consolidate Duplicates feature to clean it IMPORT FROM A SURVEY up, but it is best not to let it happen in the first place. Let’s say you distributed a survey and in that survey you collected contact information from your respondents. With the Import From a Survey option, you could take that information and turn it into a panel (Figure 8-5). Import From a Survey lets you create new panel members or update existing panel members. ADD PANEL MEMBERS Adding panel members is a quick and easy way to copy and paste your list of contacts into the tool. It can be quite useful for shorter lists of panel members. This option can be a useful for small lists, but for larger lists you will probably want to use the import feature. To paste in a list of panel members: 1. First click on your panel from your panel list to have it open in the Panel Members section. 2. Click the Add Panel Members button. 3. In the Panel field, make sure the correct panel is selected. It will preselect whichever panel you chose to get to the Panel Members page in the first place. 4. Click the “+” button on the right side to add any additional columns. The first two will be optional panel fields that are less commonly used (External Data Reference, Language). All fields after will be in the form of Embedded Data. • Click the column header to edit it, if needed. Q-TIP -TIP 5. Paste in your list. Figure 8-5 Import From a Survey dialog window. Q - T I P Q - T I P To Import From a Survey: • Remember, you can copy your entire spreadsheet (all of your rows and columns) and paste it in all at once. 1. If you have no panels set up, go to the Panel Members page, and select Import From a Survey. - T I P 2. If you already have a panel set up with panel members, click the Import/Update Panel Members button The tool will be smart and recognize the different rows and columns. Just make sure your spreadsheet’s and select Import/Update From a Survey. columns are in the same order as what you specified when pasting. It will always start with Email, First Name, 3. Under Please select import type, specify if you want to Update Recipients or Create New Recipients. Last Name, External Data Reference, and Language. Leave blank any columns you don’t use. 4. Under Please select a survey, choose the survey containing the information to use in the panel. • Remember not to paste in your column headers from your spreadsheet. Those are taken care of in the headers 5. Under Response Date Range, enter a date range of data for the tool to reference. This is optional. of the Add Panel Members dialog. If no date is provided, it will look at all data for the survey. • The Add Panel Members option is actually the same as pasting in your panel on the Email Survey page when you 6. In the area below, choose how to populate the panel information. select Enter Email Addresses in the To field. a. In the Questions column, select a survey question containing information you would like to pull in. b. In the Question Field column, choose a choice or field. On a Text Entry Form question, this is the specific form field (First Name, Last Name). c. In the Field column, choose what area of the panel the data should be placed into. This will be Embedded Data, First Name, Last Name, Email, External Data Reference, or Language. 150 | Chapter 8: Panels Chapter 8: Panels | 151
 The Complete Research Suite Page 75 Page 77