
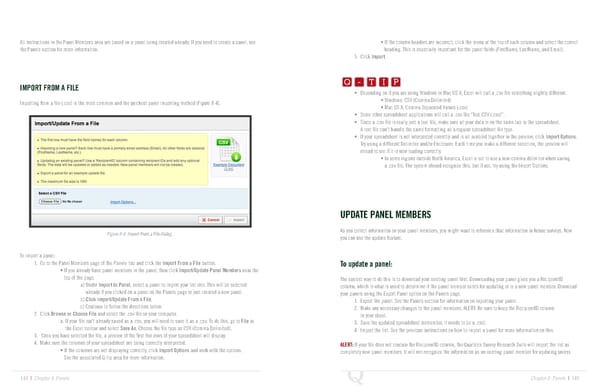
All instructions in the Panel Members area are based on a panel being created already. If you need to create a panel, see • If the column headers are incorrect, click the menu at the top of each column and select the correct the Panels section for more information. heading. This is especially important for the panel fields (FirstName, LastName, and Email). Q-TIP -TIP 5. Click Import. Q - T I P IMPORT FROM A FILE Q - T I P • Depending on if you are using Windows or Mac OS X, Excel will call a .csv file something slightly different. - T I P Importing from a file (.csv) is the most common and the quickest panel importing method (Figure 8-4). • Windows: CSV (Comma Delimited) • Mac OS X: Comma Separated Values (.csv) • Some other spreadsheet applications will call a .csv file “Text CSV (.csv)”. • Since a .csv file is really just a text file, make sure all your data is on the same tab in the spreadsheet. A text file can’t handle the same formatting as a regular spreadsheet file type. • If your spreadsheet is not interpreted correctly and is all jumbled together in the preview, click Import Options. Try using a different Delimiter and/or Enclosure. Each time you make a different selection, the preview will reload to see if it is now loading correctly. • In some regions outside North America, Excel is set to use a non-comma delimiter when saving a .csv file. The system should recognize this, but if not, try using the Import Options. UPDATE PANEL MEMBERS Figure 8-4 Import From a File dialog. As you collect information on your panel members, you might want to reference that information in future surveys. Now you can use the update feature. To import a panel: 1. Go to the Panel Members page of the Panels tab and click the Import From a File button. To update a panel: • If you already have panel members in the panel, then click Import/Update Panel Members near the top of the page. The easiest way to do this is to download your existing panel first. Downloading your panel gives you a RecipientID a) Under Import to Panel, select a panel to import your list into. This will be selected column, which is what is used to determine if the panel member exists for updating or is a new panel member. Download already if you clicked on a panel on the Panels page or just created a new panel. your panels using the Export Panel option on the Panels page. b) Click Import/Update From a File. 1. Export the panel. See the Panels section for information on exporting your panel. c) Continue to follow the directions below. 2. Make any necessary changes to the panel members. ALERT: Be sure to keep the RecipientID column 2. Click Browse or Choose File and select the .csv file on your computer. in your sheet. a. If your file isn’t already saved as a .csv, you will need to save it as a .csv. To do this, go to File in 3. Save the updated spreadsheet (remember, it needs to be a .csv). the Excel toolbar and select Save As. Choose the file type as CSV (Comma Delimited). 4. Import the list. See the previous instructions on how to import a panel for more information on this. 3. Once you have selected the file, a preview of the first five rows of your spreadsheet will display. 4. Make sure the columns of your spreadsheet are being correctly interpreted. ALERT: If your file does not contain the RecipientID column, the Qualtrics Survey Research Suite will import the list as • If the columns are not displaying correctly, click Import Options and work with the options. completely new panel members. It will not recognize the information as an existing panel member for updating unless See the associated Q-tip area for more information. 148 | Chapter 8: Panels Chapter 8: Panels | 149
 The Complete Research Suite Page 74 Page 76