
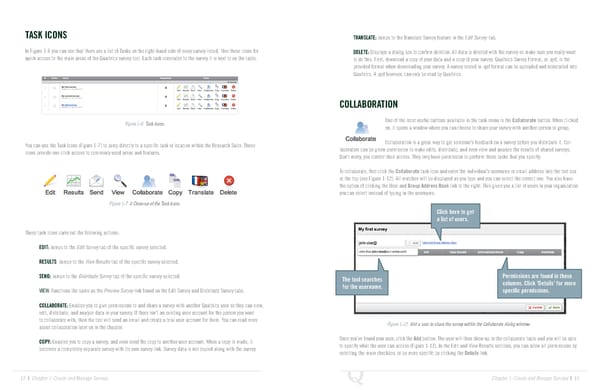
TASK ICONS TRANSLATE: Jumps to the Translate Survey feature in the Edit Survey tab. In Figure 1-6 you can see that there are a list of Tasks on the right-hand side of every survey listed. Use these icons for DELETE: Displays a dialog box to confirm deletion. All data is deleted with the survey so make sure you really want quick access to the main areas of the Qualtrics survey tool. Each task correlates to the survey it is next to on the table. to do this. First, download a copy of your data and a copy of your survey. Qualtrics Survey Format, or .qsf, is the provided format when downloading your survey. A survey stored in .qsf format can be uploaded and reinstalled into Qualtrics. A .qsf however, can only be read by Qualtrics. COLLABORATION Figure 1-6 Task Icons. One of the most useful buttons available in the task menu is the Collaborate button. When clicked on, it opens a window where you can choose to share your survey with another person or group. Collaboration is a great way to get someone’s feedback on a survey before you distribute it. Col- You can use the Task Icons (Figure 1-7) to jump directly to a specific task or location within the Research Suite. These laborators can be given permission to make edits, distribute, and even view and analyze the results of shared surveys. icons provide one-click access to commonly used areas and features. Don’t worry, you control their access. They only have permission to perform those tasks that you specify. To collaborate, first click the Collaborate task icon and enter the individual’s username or email address into the text box at the top (see Figure 1-12). All matches will be displayed as you type and you can select the correct one. You also have the option of clicking the User and Group Address Book link to the right. This gives you a list of users in your organization you can select instead of typing in the username. Figure 1-7 A Close-up of the Task Icons. Click here to get a list of users. These task icons carry out the following actions: EDIT: Jumps to the Edit Survey tab of the specific survey selected. RESULTS: Jumps to the View Results tab of the specific survey selected. SEND: Jumps to the Distribute Survey tab of the specific survey selected. The tool searches Permissions are found in these for the username. columns. Click ‘Details’ for more VIEW: Functions the same as the Preview Survey link found on the Edit Survey and Distribute Survey tabs. specific permissions. COLLABORATE: Enables you to give permissions to and share a survey with another Qualtrics user so they can view, edit, distribute, and analyze data in your survey. If there isn’t an existing user account for the person you want to collaborate with, then the tool will send an email and create a trial user account for them. You can read more Figure 1-12 Add a user to share the survey within the Collaborate dialog window. about collaboration later on in the chapter. COPY: Enables you to copy a survey, and even send the copy to another user account. When a copy is made, it Once you’ve found your user, click the Add button. The user will then show up in the collaborate table and you will be able becomes a completely separate survey with its own survey link. Survey data is not copied along with the survey. to specify what the user can access (Figure 1-13). In the Edit and View Results sections, you can allow all permissions by selecting the main checkbox, or be more specific by clicking the Details link. 12 | Chapter 1: Create and Manage Surveys Chapter 1: Create and Manage Surveys | 13
 The Complete Research Suite Page 6 Page 8