
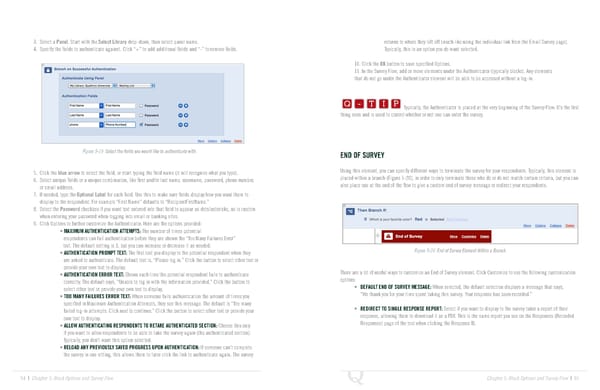
3. Select a Panel. Start with the Select Library drop-down, then select panel name. returns to where they left off (much like using the individual link from the Email Survey page). 4. Specify the fields to authenticate against. Click “+” to add additional fields and “-” to remove fields. Typically, this is an option you do want selected. 10. Click the OK button to save specified Options. 11. In the Survey Flow, add or move elements under the Authenticator (typically blocks). Any elements Q-TIP -TIP that do not go under the Authenticator element will be able to be accessed without a log-in. Q - T I P Q - T I P Typically, the Authenticator is placed at the very beginning of the Survey Flow. It’s the first thing seen and is used to control whether or not one can enter the survey. - T I P Figure 5-19 Select the fields you would like to authenticate with. END OF SURVEY 5. Click the blue arrow to select the field, or start typing the field name (it will recognize what you type). Using this element, you can specify different ways to terminate the survey for your respondents. Typically, this element is 6. Select unique fields or a unique combination, like first and/or last name, username, password, phone number, placed within a branch (Figure 5-20), in order to only terminate those who do or do not match certain criteria, but you can or email address. also place one at the end of the flow to give a custom end of survey message or redirect your respondents. 7. If needed, type the Optional Label for each field. Use this to make sure fields display how you want them to display to the respondent. For example “First Name” defaults to “RecipientFirstName.” 8. Select the Password checkbox if you want text entered into that field to appear as dots/asterisks, as is custom when entering your password when logging into email or banking sites. 9. Click Options to further customize the Authenticator. Here are the options provided: • MAXIMUM AUTHENTICATION ATTEMPTS: The number of times potential respondents can fail authentication before they are shown the “Too Many Failures Error” text. The default setting is 3, but you can increase or decrease it as needed. • AUTHENTICATION PROMPT TEXT: The first text you display to the potential respondent when they Figure 5-20 End of Survey Element Within a Branch. are asked to authenticate. The default text is, “Please log in.” Click the button to select other text or provide your own text to display. • AUTHENTICATION ERROR TEXT: Shown each time the potential respondent fails to authenticate There are a lot of useful ways to customize an End of Survey element. Click Customize to see the following customization correctly. The default says, “Unable to log in with the information provided.” Click the button to options: select other text or provide your own text to display. • DEFAULT END OF SURVEY MESSAGE: When selected, the default selection displays a message that says, • TOO MANY FAILURES ERROR TEXT: When someone fails authentication the amount of times you “We thank you for your time spent taking this survey. Your response has been recorded.” specified in Maximum Authentication Attempts, they see this message. The default is “Too many failed log-in attempts. Click next to continue.” Click the button to select other text or provide your • REDIRECT TO SINGLE RESPONSE REPORT: Select if you want to display to the survey taker a report of their own text to display. response, allowing them to download it as a PDF. This is the same report you see on the Responses (Recorded • ALLOW AUTHENTICATING RESPONDENTS TO RETAKE AUTHENTICATED SECTION: Choose this only Responses) page of the tool when clicking the Response ID. if you want to allow respondents to be able to take the survey again (the authenticated section). Typically, you don’t want this option selected. • RELOAD ANY PREVIOUSLY SAVED PROGRESS UPON AUTHENTICATION: If someone can’t complete the survey in one sitting, this allows them to later click the link to authenticate again. The survey 94 | Chapter 5: Block Options and Survey Flow Chapter 5: Block Options and Survey Flow | 95
 The Complete Research Suite Page 47 Page 49