
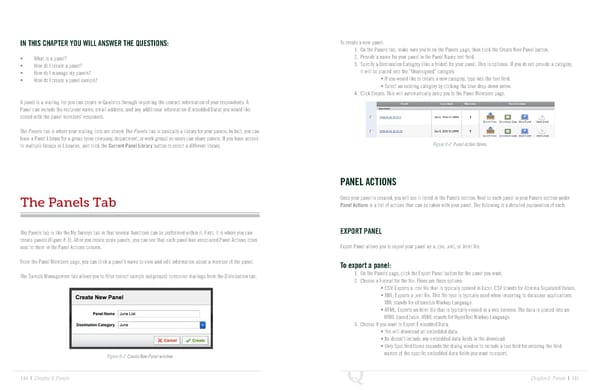
IN THIS CHAPTER YOU WILL ANSWER THE QUESTIONS: To create a new panel: 1. On the Panels tab, make sure you’re on the Panels page, then click the Create New Panel button. • What is a panel? 2. Provide a name for your panel in the Panel Name text field. • How do I create a panel? 3. Specify a Destination Category (like a folder) for your panel. This is optional. If you do not provide a category, • How do I manage my panels? it will be placed into the “Unassigned” category. • How do I create a panel sample? • If you would like to create a new category, type into the text field. • Select an existing category by clicking the blue drop-down arrow. 4. Click Create. This will automatically jump you to the Panel Members page. A panel is a mailing list you can create in Qualtrics through importing the contact information of your respondents. A Panel can include the recipient name, email address, and any additional information (Embedded Data) you would like stored with the panel members’ responses. The Panels tab is where your mailing lists are stored. The Panels tab is basically a library for your panels. In fact, you can have a Panel Library for a group (your company, department, or work group) so users can share panels. If you have access to multiple Groups or Libraries, just click the Current Panel Library button to select a different library. Figure 8-2 Panel Action Items. PANEL ACTIONS The Panels Tab Once your panel is created, you will see it listed in the Panels section. Next to each panel in your Panels section under Panel Actions is a list of actions that can be taken with your panel. The following is a detailed explanation of each. The Panels tab is like the My Surveys tab in that several functions can be performed within it. First, it is where you can EXPORT PANEL create panels (Figure 8-1). After you create some panels, you can see that each panel has associated Panel Actions icons next to them in the Panel Actions column. Export Panel allows you to export your panel as a .csv, .xml, or .html file. From the Panel Members page, you can click a panel’s name to view and edit information about a member of the panel. To export a panel: The Sample Management tab allows you to filter (select sample subgroups) to receive mailings from the Distribution tab. 1. On the Panels page, click the Export Panel button for the panel you want. 2. Choose a Format for the file. There are three options: • CSV: Exports a .csv file that is typically opened in Excel. CSV stands for Comma Separated Values. • XML: Exports a .xml file. This file type is typically used when importing to database applications. XML stands for eXtensible Markup Language. • HTML: Exports an html file that is typically viewed in a web browser. The data is placed into an HTML based table. HTML stands for HyperText Markup Language. 3. Choose if you want to Export Embedded Data. • Yes will download all embedded data. • No doesn’t include any embedded data fields in the download. • Only Specified Items expands the dialog window to include a text field for entering the field Figure 8-1 Create New Panel window. names of the specific embedded data fields you want to export. 144 | Chapter 8: Panels Chapter 8: Panels | 145
 The Complete Research Suite Page 72 Page 74