
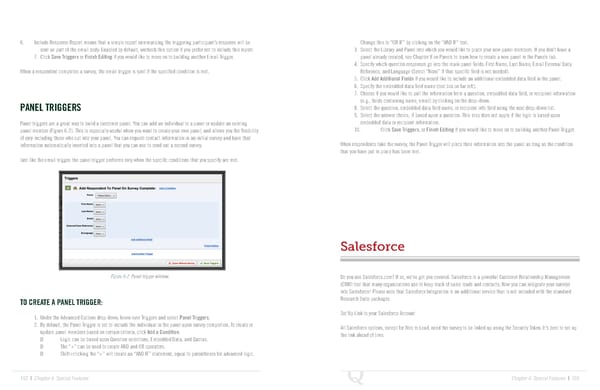
6. Include Response Report means that a simple report summarizing the triggering participant’s response will be Change this to “OR IF” by clicking on the “AND IF” text. sent as part of the email body. Enabled by default, uncheck this option if you prefer not to include this report. 3. Select the Library and Panel into which you would like to place your new panel members. If you don’t have a 7. Click Save Triggers or Finish Editing if you would like to move on to building another Email Trigger. panel already created, see Chapter 8 on Panels to learn how to create a new panel in the Panels tab. 4. Specify which question responses go into the main panel fields: First Name, Last Name, Email External Data When a respondent completes a survey, the email trigger is sent if the specified condition is met. Reference, and Language (Select “None” if that specific field is not needed). 5. Click Add Additional Fields if you would like to include an additional embedded data field in the panel. 6. Specify the embedded data field name (text box on far left). 7. Choose if you would like to pull the information from a question, embedded data field, or recipient information (e.g., fields containing name, email) by clicking on the drop-down. PANEL TRIGGERS 8. Select the question, embedded data field name, or recipient info field using the next drop-down list. 9. Select the answer choice, if based upon a question. This step does not apply if the logic is based upon Panel triggers are a great way to build a customer panel. You can add an individual to a panel or update an existing embedded data or recipient information. panel member (Figure 6-2). This is especially useful when you want to create your own panel, and allows you the flexibility 10. Click Save Triggers, or Finish Editing if you would like to move on to building another Panel Trigger. of only including those who opt into your panel. You can request contact information in an initial survey and have that information automatically inserted into a panel that you can use to send out a second survey. When respondents take the survey, the Panel Trigger will place their information into the panel as long as the condition that you have put in place has been met. Just like the email trigger, the panel trigger performs only when the specific conditions that you specify are met. Salesforce Figure 6-2 Panel trigger window. Do you use Salesforce.com? If so, we’ve got you covered. Salesforce is a powerful Customer Relationship Management (CRM) tool that many organizations use to keep track of sales leads and contacts. Now you can integrate your surveys into Salesforce! Please note that Salesforce Integration is an additional service that is not included with the standard TO CREATE A PANEL TRIGGER: Research Suite packages. 1. Under the Advanced Options drop-down, hover over Triggers and select Panel Triggers. Set Up Link to your Salesforce Account 2. By default, the Panel Trigger is set to include the individual in the panel upon survey completion. To create or All Salesforce options, except for Web to Lead, need the survey to be linked up using the Security Token. It’s best to set up update panel members based on certain criteria, click Add a Condition. the link ahead of time. Logic can be based upon Question selections, Embedded Data, and Quotas. The “+” can be used to create AND and OR operators. Shift+clicking the “+” will create an “AND IF” statement, equal to parentheses for advanced logic. 102 | Chapter 6: Special Features Chapter 6: Special Features | 103
 The Complete Research Suite Page 51 Page 53