
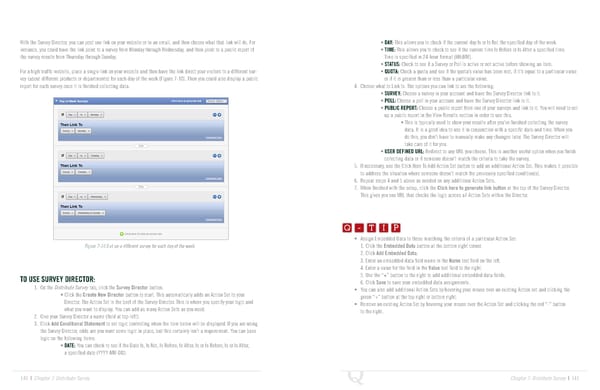
With the Survey Director, you can post one link on your website or in an email, and then choose what that link will do. For • DAY: This allows you to check if the current day Is or Is Not the specified day of the week. instance, you could have the link point to a survey from Monday through Wednesday, and then point to a public report of • TIME: This allows you to check to see if the current time Is Before or Is After a specified time. the survey results from Thursday through Sunday. Time is specified in 24-hour format (HH:MM). • STATUS: Check to see if a Survey or Poll is active or not active before showing an item. For a high traffic website, place a single link on your website and then have the link direct your visitors to a different sur- • QUOTA: Check a quota and see if the quota’s value has been met, if it’s equal to a particular value vey (about different products or departments) for each day of the week (Figure 7-10). Then you could also display a public or if it is greater than or less than a particular value. report for each survey once it is finished collecting data. 4. Choose what to Link to. The options you can link to are the following: • SURVEY: Choose a survey in your account and have the Survey Director link to it. • POLL: Choose a poll in your account and have the Survey Director link to it. • PUBLIC REPORT: Choose a public report from one of your surveys and link to it. You will need to set up a public report in the View Results section in order to use this. • This is typically used to show your results after you’ve finished collecting the survey data. It is a good idea to use it in conjunction with a specific date and time. When you do this, you don’t have to manually make any changes later. The Survey Director will take care of it for you. • USER DEFINED URL: Redirect to any URL you choose. This is another useful option when you finish collecting data or if someone doesn’t match the criteria to take the survey. 5. If necessary, use the Click Here To Add Action Set button to add an additional Action Set. This makes it possible to address the situation where someone doesn’t match the previously specified condition(s). 6. Repeat steps 4 and 5 above as needed on any additional Action Sets. 7. When finished with the setup, click the Click here to generate link button at the top of the Survey Director. This gives you one URL that checks the logic across all Action Sets within the Director. Q-TIP -TIP Q - T I P Q - T I P • Assign Embedded Data to those matching the criteria of a particular Action Set: - T I P Figure 7-10 S et up a different survey for each day of the week. 1. Click the Embedded Data button at the bottom right corner. 2. Click Add Embedded Data. 3. Enter an embedded data field name in the Name text field on the left. 4. Enter a value for the field in the Value text field to the right. TO USE SURVEY DIRECTOR: 5. Use the “+” button to the right to add additional embedded data fields. 1. On the Distribute Survey tab, click the Survey Director button. 6. Click Save to save your embedded data assignments. • You can also add additional Action Sets by hovering your mouse over an existing Action set and clicking the • Click the Create New Director button to start. This automatically adds an Action Set to your green “+” button at the top right or bottom right. Director. The Action Set is the beef of the Survey Director. This is where you specify your logic and • Remove an existing Action Set by hovering your mouse over the Action Set and clicking the red “-” button what you want to display. You can add as many Action Sets as you need. to the right. 2. Give your Survey Director a name (field at top-left). 3. Click Add Conditional Statement to set logic controlling when the item below will be displayed. If you are using the Survey Director, odds are you want some logic in place, but this certainly isn’t a requirement. You can base logic on the following items: • DATE: You can check to see if the Date Is, Is Not, Is Before, Is After, Is or Is Before, Is or Is After, a specified date (YYYY-MM-DD). 140 | Chapter 7: Distribute Survey Chapter 7: Distribute Survey | 141
 The Complete Research Suite Page 70 Page 72