
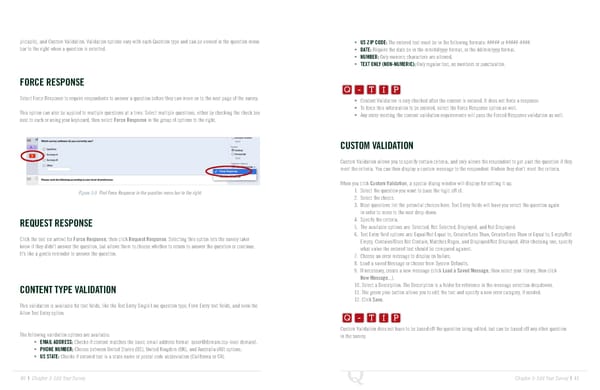
plicable), and Custom Validation. Validation options vary with each Question type and can be viewed in the question menu • US ZIP CODE: The entered text must be in the following formats: ##### or #####-####. bar to the right when a question is selected. • DATE: Require the date be in the mm/dd/yyyy format, or the dd/mm/yyyy format. • NUMBER: Only numeric characters are allowed. Q-TIP -TIP • TEXT ONLY (NON-NUMERIC): Only regular text, no numbers or punctuation. FORCE RESPONSE Q - T I P Q - T I P Select Force Response to require respondents to answer a question before they can move on to the next page of the survey. • Content Validation is only checked after the content is entered. It does not force a response. - T I P This option can also be applied to multiple questions at a time. Select multiple questions, either by checking the check box • To force this information to be entered, select the Force Response option as well. next to each or using your keyboard, then select Force Response in the group of options to the right. • Any entry meeting the content validation requirements will pass the Forced Response validation as well. CUSTOM VALIDATION Custom Validation allows you to specify certain criteria, and only allows the respondent to get past the question if they meet the criteria. You can then display a custom message to the respondent if/when they don’t meet the criteria. When you click Custom Validation, a special dialog window will display for setting it up. Figure 3-9 Find Force Response in the question menu bar to the right. 1. Select the question you want to base the logic off of. 2. Select the choice. 3. Most questions list the potential choices here. Text Entry fields will have you select the question again in order to move to the next drop-down. REQUEST RESPONSE 4. Specify the criteria. 5. The available options are: Selected, Not Selected, Displayed, and Not Displayed. Click the text (or arrow) for Force Response, then click Request Response. Selecting this option lets the survey taker 6. Text Entry field options are: Equal/Not Equal to, Greater/Less Than, Greater/Less Than or Equal to, Empty/Not know if they didn’t answer the question, but allows them to choose whether to return to answer the question or continue. Empty, Contains/Does Not Contain, Matches Regex, and Displayed/Not Displayed. After choosing one, specify It’s like a gentle reminder to answer the question. what value the entered text should be compared against. 7. Choose an error message to display on failure. 8. Load a saved Message or choose from System Defaults. 9. If necessary, create a new message (click Load a Saved Message, then select your library, then click New Message...). 10. Select a Description. The Description is a folder for reference in the message selection dropdowns. CONTENT TYPE VALIDATION Q-TIP -TIP 11. The green plus button allows you to edit the text and specify a new error category, if needed. 12. Click Save. This validation is available for text fields, like the Text Entry Single Line question type, Form Entry text fields, and even the Q - T I P Allow Text Entry option. Q - T I P Custom Validation does not have to be based off the question being edited, but can be based off any other question The following validation options are available: - T I P in the survey. • EMAIL ADDRESS: Checks if content matches the basic email address format (user@domain.top-level domain). • PHONE NUMBER: Choose between United States (US), United Kingdom (UK), and Australia (AU) options. • US STATE: Checks if entered text is a state name or postal code abbreviation (California or CA). 40 | Chapter 3: Edit Your Survey Chapter 3: Edit Your Survey | 41
 The Complete Research Suite Page 20 Page 22