
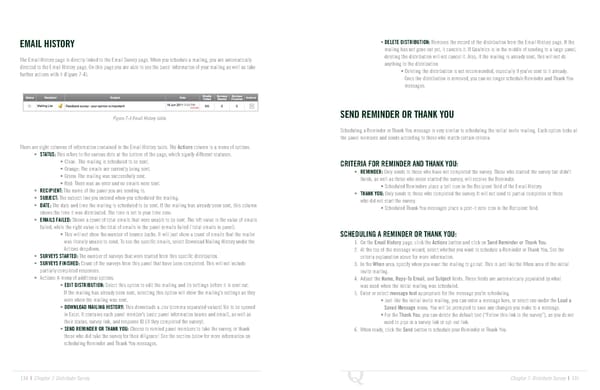
EMAIL HISTORY • DELETE DISTRIBUTION: Removes the record of the distribution from the Email History page. If the mailing has not gone out yet, it cancels it. If Qualtrics is in the middle of sending to a large panel, The Email History page is directly linked to the Email Survey page. When you schedule a mailing, you are automatically deleting the distribution will not cancel it. Also, if the mailing is already sent, this will not do directed to the Email History page. On this page you are able to see the basic information of your mailing as well as take anything to the distribution further actions with it (Figure 7-4). • Deleting the distribution is not recommended, especially if you’ve sent to it already. Once the distribution is removed, you can no longer schedule Reminder and Thank You messages. Figure 7-4 Email History table. SEND REMINDER OR THANK YOU Scheduling a Reminder or Thank You message is very similar to scheduling the initial invite mailing. Each option looks at the panel members and sends according to those who match certain criteria. There are eight columns of information contained in the Email History table. The Actions column is a menu of options. • STATUS: This refers to the various dots at the bottom of the page, which signify different statuses. • Clear: The mailing is scheduled to be sent. CRITERIA FOR REMINDER AND THANK YOU: • Orange: The emails are currently being sent. • REMINDER: Only sends to those who have not completed the survey. Those who started the survey but didn’t • Green: The mailing was successfully sent. finish, as well as those who never started the survey, will receive the Reminder. • Red: There was an error and no emails were sent. • Scheduled Reminders place a bell icon in the Recipient field of the Email History. • RECIPIENT: The name of the panel you are sending to. • THANK YOU: Only sends to those who completed the survey. It will not send to partial completes or those • SUBJECT: The subject line you entered when you scheduled the mailing. who did not start the survey. • DATE: The date and time the mailing is scheduled to be sent. If the mailing has already been sent, this column • Scheduled Thank You messages place a post-it note icon in the Recipient field. shows the time it was distributed. The time is set to your time zone. • EMAILS FAILED: Shows a count of total emails that were unable to be sent. The left value is the value of emails failed, while the right value is the total of emails in the panel (emails failed / total emails in panel). • This will not show the number of bounce backs. It will just show a count of emails that the mailer SCHEDULING A REMINDER OR THANK YOU: was literally unable to send. To see the specific emails, select Download Mailing History under the 1. On the Email History page, click the Actions button and click on Send Reminder or Thank You. Actions dropdown. 2. At the top of the message wizard, select whether you want to schedule a Reminder or Thank You. See the • SURVEYS STARTED: The number of surveys that were started from this specific distribution. criteria explanation above for more information. • SURVEYS FINISHED: Count of the surveys from this panel that have been completed. This will not include 3. In the When area, specify when you want the mailing to go out. This is just like the When area of the initial partially completed responses. invite mailing. • Actions: A menu of additional options. 4. Adjust the Name, Repy-To Email, and Subject fields. These fields are automatically populated by what • EDIT DISTRIBUTION: Select this option to edit the mailing and its settings before it is sent out. was used when the initial mailing was scheduled. If the mailing has already been sent, selecting this option will show the mailing’s settings as they 5. Enter or select message text appropriate for the message you’re scheduling. were when the mailing was sent. • Just like the initial invite mailing, you can enter a message here, or select one under the Load a • DOWNLOAD MAILING HISTORY: This downloads a .csv (comma separated values) file to be opened Saved Message menu. You will be prompted to save any changes you make to a message. in Excel. It contains each panel member’s basic panel information (name and email), as well as • For the Thank You, you can delete the default text (“Follow this link to the survey”), as you do not their status, survey link, and response ID (if they completed the survey). need to pipe in a survey link or opt-out link. • SEND REMINDER OR THANK YOU: Choose to remind panel members to take the survey, or thank 6. When ready, click the Send button to schedule your Reminder or Thank You. those who did take the survey for their diligence! See the section below for more information on scheduling Reminder and Thank You messages. 134 | Chapter 7: Distribute Survey Chapter 7: Distribute Survey | 135
 The Complete Research Suite Page 67 Page 69